
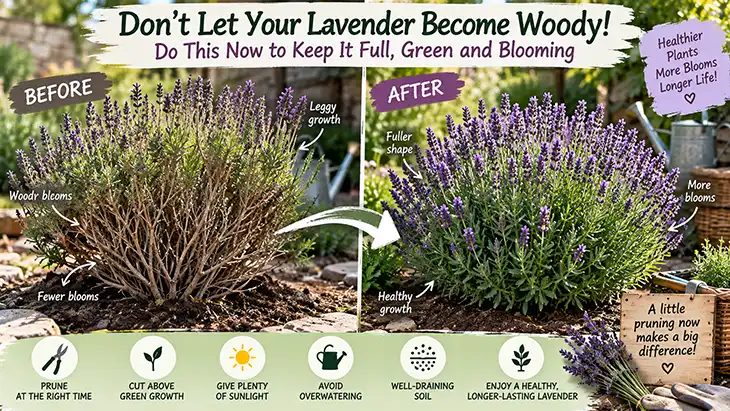
When lavender plants are young, they often present an almost perfect picture: a compact shrub, silvery green, fragrant, and covered in flowers.
But over the years, a change begins to take place.
The center of the plant starts to open up. Thick, brown stems become visible beneath the foliage. New growth is mostly limited to the tips of long branches, and what was once a rounded bush becomes sparse, woody, and tired-looking.
This is partly natural because lavender is a woody shrub, not a tender herbaceous plant. Over time, its stems naturally harden.
However, there is a significant difference between this normal woody development and lavender that prematurely hollows out, becoming bare and difficult to rejuvenate.
The best prevention is not to wait until the plant ages before performing severe pruning.
The key is regular pruning as long as the plant still has plenty of green shoots.
Once lavender has turned into a mass of old wood with no leaves, it becomes much more complicated to restore its original shape.
Here, we explain how to act now—when to prune, where to cut, and which mistakes to avoid so as not to damage a healthy lavender permanently.
Why Does Lavender Become Woody?
Each year, lavender produces new green shoots from its older stems.
As these stems mature, their base turns brown and woody. This forms the permanent structure that allows the shrub to survive for multiple years.
Some lignification is completely normal.
Problems arise when plants are allowed to grow tall and wide without sufficient pruning year after year.
Over time, leafy growth increasingly concentrates toward the tips while the interior becomes bare and woody.
You then get:
- Long bare stems
- An open center
- Foliage only at the branch tips
- Drooping branches
- A plant that loses its cohesion
- Fewer attractive flowering shoots
- An irregular and spread-out shape
At this stage, cutting the plant back to its original size might not be enough.
Many lavenders do not reliably regrow from old, entirely leafless wood.
This is why prevention is essential.
Essential Rule: Never Wait Until Lavender Is Completely Woody
Regular pruning stimulates branching near the plant’s main framework.
Whenever you properly shorten young leafy shoots, you help maintain a network of compact growth points.
If you go several years without pruning, the green growth gradually moves away from the center.
To illustrate:
Small regular prunings prevent drastic, risky cuts later.
When to Prune Lavender?
The exact timing varies depending on the lavender type and your climate, but generally, two recommended pruning periods can be identified:
In Spring
This is the ideal opportunity to remove winter damage and shape established plants when new growth makes it clear which stems are still alive.
After Flowering
A second pruning after the main flowering period removes faded flower stems and helps maintain the plant’s compact shape.
In regions with cold winters, avoid heavy pruning late in autumn.
Fresh growth stimulated just before the first frosts is more susceptible to winter damage.
If Pruning in Late Summer or Early Autumn, Proceed as Follows:
Once summer flowering has finished, you may notice a disorderly appearance caused by dry flower stems sticking out through the foliage.
This is a good time to perform a cleanup.
However, do not treat lavender like a hedge to be cut back to bare branches.
Step 1: Remove Dead Flowers
Cut off faded flower stems.
Generally, you can also remove a small amount of foliage just below these when shaping the shrub.
This immediately gives the plant a neater appearance.
More importantly, it provides better visibility of its actual structure.
Step 2: Look for Green Growth
Before making any significant cuts, follow the stem down to its base.
You will see the transition between younger, leafy growth and old brown wood.
The goal is usually to prune while there are still healthy green shoots below the cut.
Do not blindly cut all stems at the same height.
Step 3: Create a Rounded Shape
Lavender naturally has a harmonious mound-shaped form.
Shorten overly long stems and create a gently rounded shape on the outer edge of the growth.
Avoid making the top completely flat.
A natural dome allows light to penetrate throughout the plant, which supports its aesthetic structure.
Step 4: Do Not Over-Prune
For maintenance pruning, removing about one quarter to one third of the foliage is often sufficient.
The exact amount depends on the plant’s condition, variety, season, and climate.
The closer winter approaches, the more cautious you should be, especially in colder areas.
Why Should You Never Cut Lavender to the Ground?
This is probably the most common error when pruning lavender.
You see a large woody shrub and think:
“I will cut everything back to start fresh.”
This method works well with some herbaceous plants.
Not with lavender.
If you remove all the foliage and leave only bare, old stems, the plant will produce few or no new shoots.
Before long, a lavender that was still alive but somewhat unsightly can become a mass of dead branches.
Before making any major cut, ask yourself:
Are there healthy shoots below where I am cutting?
If not, it’s better to reconsider the cut.
Do Not Neglect Spring Pruning Either
In regions with harsh winters, spring is often the safest time to perform a more significant annual pruning.
Do not prune too early.
At the end of winter, lavender may look gray and lifeless, even if the stems are still alive.
Wait for signs of new growth to appear.
Then examine the plant carefully.
Remove Truly Dead Branches
Test questionable stems by lightly scraping a small piece of bark.
Green tissue under the bark indicates life.
Brown, dry, and brittle tissue usually means the stem is dead.
Remove truly dead stems, preserving the living wood.
Shape the Remaining Plant
Once winter has passed, shorten healthy leafy shoots to encourage a compact form.
Again, avoid cutting deeply into old bare wood just to achieve a perfectly symmetrical silhouette.
The plant’s health comes before symmetry.
What If Your Lavender Is Already Woody?
You need to be careful.
If the plant has a woody center but still retains many green shoots, don’t panic.
A base of woody stems is entirely normal for an older lavender.
Your goal should be to prevent bare areas from spreading.
Favor Gradual Improvement
Instead of removing half the plant at once:
First remove dead branches.
Shorten excessively long leafy shoots.
Maintain a rounded shape.
Leave old wood bearing healthy growth intact.
Continue moderate pruning every year.
This gradual approach is much safer than a radical renovation.
Is It Possible to Rejuvenate an Old Woody Lavender?
Sometimes it is, but without guarantee.
Some lavenders regrow better than others from their lower parts, especially if buds or young shoots are still visible.
Do not count on regrowth from completely bare old wood.
If you see small green shoots low down on a branch, severe pruning becomes more feasible.
But if a branch is brown and completely leafless for a considerable length, drastic pruning carries more risk.
For a very old, sprawling plant with little foliage only at the tips, it may be more practical to eventually replace it.
Consider taking cuttings from healthy young shoots before removing the plant.
This way, you can replace it effectively.
Take Cuttings Before It’s Too Late
This is one of the best safeguards for aging lavender.
Healthy shoots, not flowering or slightly mature, can be propagated.
Choose vigorous branches free from disease and pests.
Remove the lower leaves and root them using the appropriate method.
If your old lavender eventually dies, you will already have several young plants ready to replace it.
And these young plants can be properly shaped from the start.
Start Pruning Lavender Early While Young
Do not let your lavender become huge before intervening.
Once the planted lavender is well established and growing vigorously, light pruning can encourage branching.
A plant with many branches near the base is more likely to form a dense mound.
A plant left to produce a few large stems is more likely to become open and spindly.
This maintenance approach where a little effort each year greatly simplifies future repairs is wise.
Do Not Confuse Woody Stems with a Dying Lavender
Brown stems at the base do not necessarily mean your lavender is dying.
Remember: lavender is a woody shrub.
Look at the plant as a whole.
If it has:
- Bright green or silvery-green foliage
- Healthy new shoots
- Plenty of flowers
- Strong branches
- No widespread decline
Then the woody base is simply a normal sign of aging.
What you need to avoid is a bare area that keeps expanding accompanied by a decline in foliage.
Pruning Alone Is Not Enough to Keep Lavender Compact
You may prune perfectly but still end up with a weak, open bush if growing conditions are poor.
Several other factors influence lavender density.
1. Provide Maximum Sunlight
Lavender is a Mediterranean plant that loves the sun.
Most varieties perform best with at least 6 to 8 hours of direct sunlight. Generous sunlight promotes denser growth and better flowering.
In shade, stems stretch toward available light.
The plant then becomes:
- Taller
- Looser
- Less sturdy
- Less floriferous
Pruning cannot compensate for a lack of light.
If your lavender often becomes spindly, reconsider its location.
2. Avoid Over-Fertilizing
It seems logical that feeding lavender will make it healthier.
But overly rich soil or too much nitrogen fertilizer promotes fast, soft, and loose vegetative growth.
Lavender naturally prefers rather poor soil.
Do not attempt to turn its location into the richest spot in your garden.
More fertilizer does not necessarily mean more flowers.
3. Excellent Drainage Is Essential
Woody lavender is not necessarily unhealthy.
But woody lavender with dying areas can indicate another problem: drainage.
Lavender roots do not like to remain in constantly wet soil.
Excess water can cause root and collar problems, leading to:
- Brown foliage
- Grayish appearance
- Weak branches
- Dead sections
- Rapid decline
Ironically, faced with dried foliage, some gardeners water even more.
Always check the soil condition before watering.
4. Do Not Let the Collar Get Buried Under Moist Mulch
A thick organic mulch pressed against lavender stems can keep the collar too moist.
Allow the base of the plant to breathe.
Under good conditions, a mineral mulch like gravel is often better suited to lavender as it does not retain organic moisture around the collar in the same way.
Whatever your choice, avoid overcovering the plant excessively.
5. Give Each Plant Enough Space
It is tempting to plant young lavenders very close together to fill gaps left by their small size.
But they grow.
Mature plants that are too crowded get less air and compete for light.
Check the mature width of your variety to set spacing.
It is better to leave some room between young plants than to manage overcrowded shrubs several years later.
6. Do Not Water Mature Lavender Like a Thirsty Annual
Newly planted lavender requires more attention during rooting.
A well-established plant is different.
Once well-rooted in suitable soil, lavender tolerates drought surprisingly well.
Frequent but shallow watering can create undesirable conditions around the roots.
When watering, prefer deep, less frequent applications rather than keeping the surface constantly moist.
Potted lavender is a special case because containers dry faster. Adjust watering accordingly.
Lavender in Pots: Specificities of Pruning and Care
Potted plants can also become woody.
Pruning rules are similar:
- Prune regularly
- Keep green foliage below cuts
- Remove dead flowers
- Avoid severe pruning late in the season
- Provide plenty of light
Drainage in pots requires special attention.
Choose a container with drainage holes and never let the plant sit in water.
Also mind pot size: too small limits root growth and dries quickly; too large retains excess moisture.
English Lavender, Lavandin, Spanish Types: Varied Lavender Behaviors
“Pruning lavender” doesn’t mean exactly the same thing for all types, which have distinct behaviors.
English Lavender (Lavandula angustifolia)
This is usually the most cold-hardy variety, grown as a perennial in cooler climates.
It responds well to regular pruning as long as green growth is present.
Lavandin (Lavandula × intermedia)
These shrubs can become large and vigorous. They especially benefit from annual pruning to prevent spreading too much.
Spanish and French Lavenders
Less hardy, they can flower variably depending on the climate.
The pruning schedule is therefore more flexible.
Where possible, identify the type you are growing instead of generalizing care.
The “Green Foliage” Rule Simplifies Pruning
If you take away only one point from this article, let it be this:
Before cutting a branch, look below your cutting point.
If you still see healthy leaves and active growth, you are usually in a safe pruning zone.
If the cut would leave behind a completely bare stub, stop immediately.
This simple visual check prevents one of the most common mistakes in lavender pruning.
7 Common Mistakes That Accelerate Lavender Lignification
Mistake 1: Never Pruning
The plant progressively grows taller, sparse, and woody.
Better approach:
Appropriate pruning every year.
Mistake 2: Waiting Until the Plant Is Old to Start
Once lower branches are bare, options become limited.
Better approach:
Start shaping young plants soon after establishment.
Mistake 3: Cutting Into Old Bare Wood
This leaves permanently dead branches.
Better approach:
Leave healthy foliage below maintenance cuts.
Mistake 4: Over-Severe Pruning Before Winter
Young shoots become vulnerable to frost.
Better approach:
Perform moderate pruning late season in cold climates and favor heavier pruning in spring.
Mistake 5: Growing Lavender in the Shade
Shade encourages lanky, bare growth.
Better approach:
Provide abundant, direct sunlight.
Mistake 6: Excessive Feeding
Too much fertilizer results in soft, unattractive growth.
Better approach:
Adjust nutrition to your soil and stay moderate.
