
How to Grow Fig Trees from Cuttings (A Simple Step-by-Step Guide)
Propagating fig trees from cuttings is one of the most reliable and beginner-friendly ways to grow new plants. Each fig branch naturally contains hidden cells capable of forming roots. With the right setup, even a simple piece of wood can transform into a new tree that is an exact clone of the parent plant.
Although fig trees are hardy, successful propagation depends on avoiding rot and encouraging fast root development. The following guide explains the process in clear, practical steps you can easily follow at home.
1. Choosing the Right Cutting
Everything starts with selecting good material. Healthy wood gives you the best chance of success.
Type of Wood: Use hardwood from the previous growing season. It should look brown or slightly gray, not soft or green.
Thickness: Aim for a cutting about the size of a pencil or your little finger.

Timing: The ideal time to take cuttings is during dormancy—late winter or very early spring.
No Leaves: Remove all leaves. They cause moisture loss, which can dry out the cutting before roots form.
2. Cutting and Preparing the Stem
How you shape the cutting plays a big role in how it grows.
Understanding Nodes:
Nodes are the small bumps on the stem. They are growth points where roots or leaves can develop depending on their position.
Identify Top and Bottom: It’s crucial to plant the cutting upright. Reversing it will almost always lead to failure.
Top Cut: Make a clean, flat cut about 1–2 cm above a node.
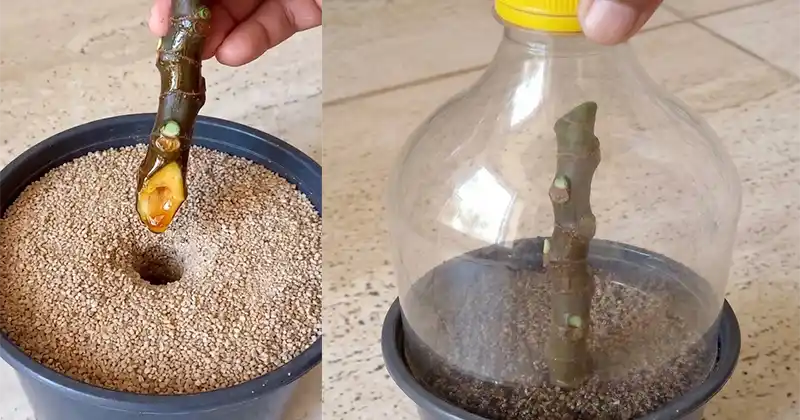
Bottom Cut: Make a slanted cut (around 45°) just below a node. This increases the rooting area and helps you remember which end goes down.
Length: A good cutting is 15–25 cm (6–10 inches) long with 3–5 nodes.
3. Using Rooting Aids and Sealing
While figs root easily, a few extra steps can improve your success rate.
Rooting Boosters:
Honey: Offers some protection against bacteria but is only mildly effective.
Rooting Hormone: A commercial powder or gel works best, helping trigger faster root growth. Dip the base in water, then in the hormone before planting.
Seal the Top:
The top cut can lose moisture quickly. Seal it with melted candle wax, wood glue, or tree wound sealant to prevent drying out.
4. Setting Up the Pot Correctly
This is where many beginners make mistakes. Proper setup is essential.
One Cutting per Container (Very Important):
Never plant multiple cuttings in the same pot. Their roots will tangle, making separation difficult and damaging.
Use a Light, Sterile Medium:
Avoid garden soil—it holds too much moisture and may contain harmful organisms. Instead, use:
Coarse sand
Perlite
Or a mix of perlite and peat moss (50/50)
Planting Depth:
Make a hole (using a pencil works well) and insert the cutting so that:
At least two nodes are buried
One or two nodes remain above the surface
5. Creating a Humid Environment
Since the cutting has no roots yet, it relies on internal moisture. Humidity helps prevent it from drying out.
Build a Mini Greenhouse:
Cover the cutting with a clear plastic dome. A cut plastic bottle works perfectly.
Check Moisture:
Condensation inside the cover means humidity levels are correct.
6. Care and Monitoring
Once planted, proper care will determine success.
Light:
Place in a bright spot but avoid direct sunlight, which can overheat and damage the cutting.
Temperature:
Keep conditions warm and stable (around 18–24°C / 65–75°F).
Air Circulation:
If you notice mold or stale air, briefly remove the cover for 10–15 minutes every few days.
Be Patient:
Rooting usually takes 3–6 weeks. Signs of success include new leaf growth. You can also gently tug the cutting—if it resists, roots have formed.
